How To Make Fake Blood

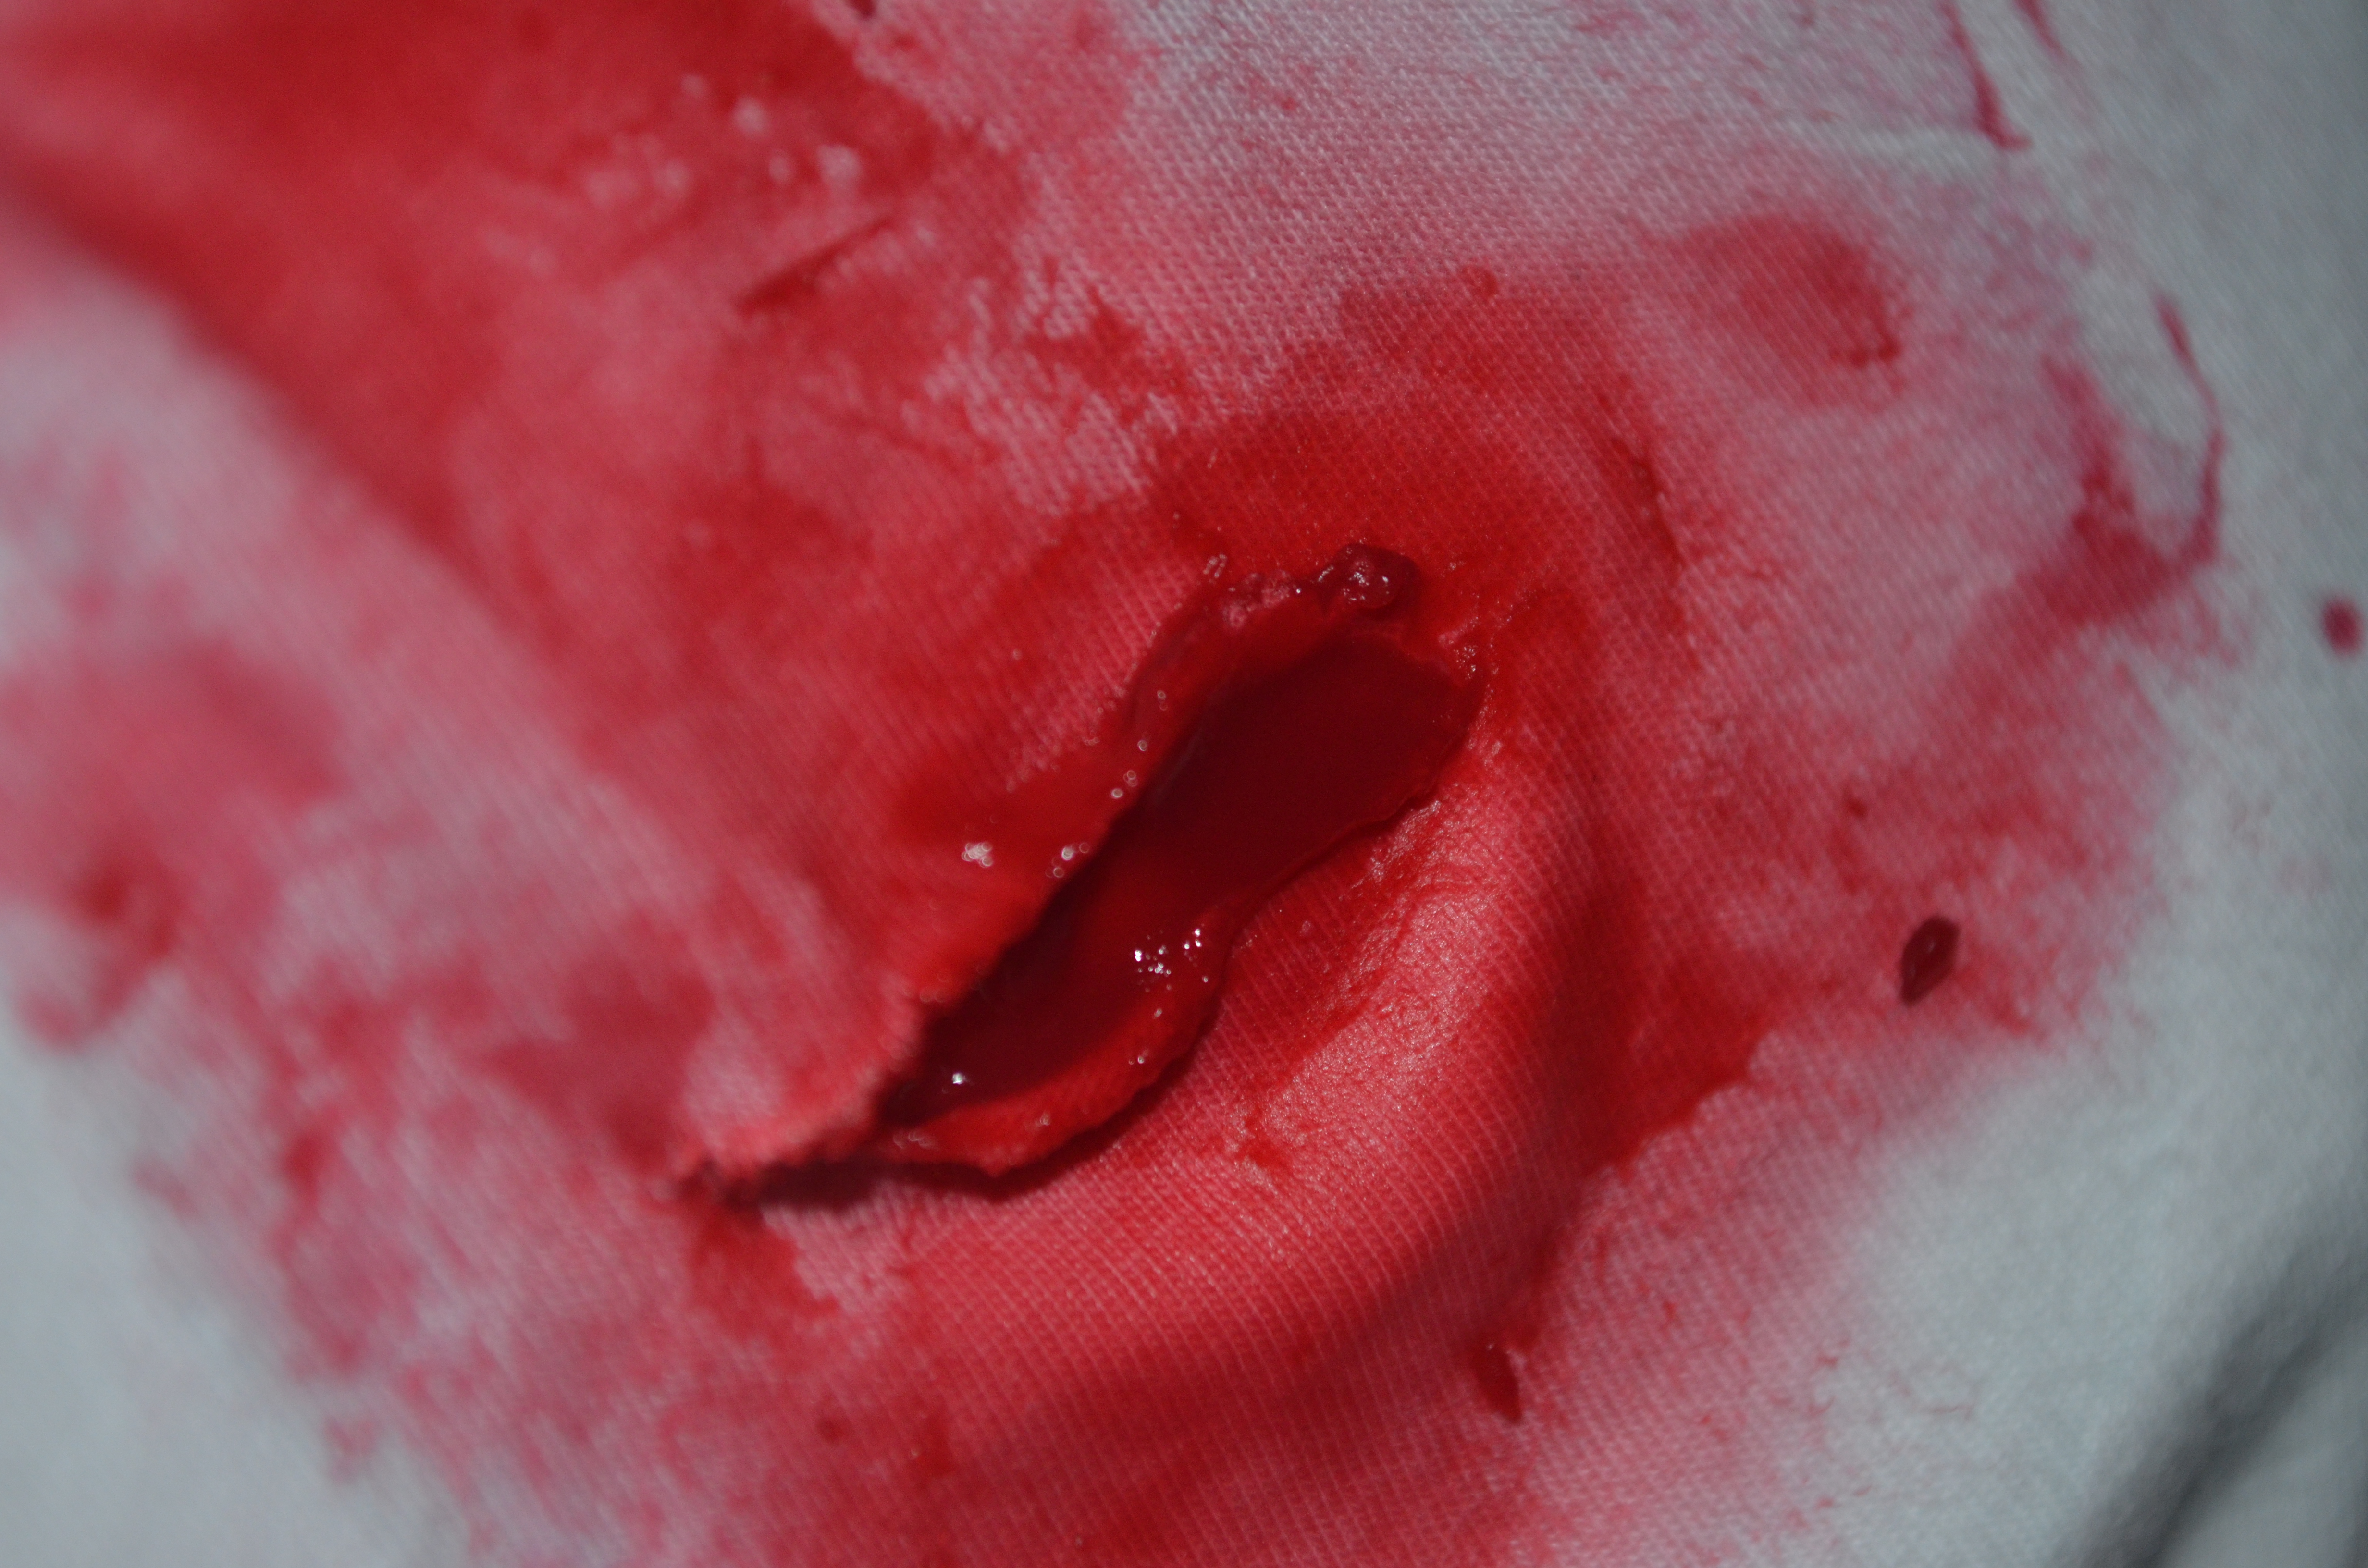
In this post, I will explain how I made fake blood that I used in my previous post (https://memorieslikefilm.wordpress.com/2013/08/13/csi-drama-part-3/) to simulate a murder scene.

All of the ingredients that I used, can be found in almost any kitchen. I don’t have exact measurements of whatever I used, because I used trial and error to get the best result. I made a total of 3 batches before I finally got it right.

Here are the ingredients that I used:

– Corn Flour

– Red & Blue Food Colouring

– Water

– Bicarbonate Of Soda

Like I said, I used trial and error, so these are the steps that I followed:

1. Pour water into a bowl, add the corn flour and stir until it looks like milk. Take note, it must still be watery and very runny.

2. Take the mixed bowl of water and corn flour and put it in the microwave. As you warm up the concoction in the microwave, be sure to stir it now and then, otherwise you’ll be left with clots in your fake blood. You will notice that the mixture will slowly become thicker.

3. Once you have the desired consistency, add a very small amount of red food colouring (rather start adding too little than too much). If you find that the mixture is too thick, then you can still add water to make it thinner and more runny again. Stir the mixture until the red food colouring has completely set in.

If the colour of the fake blood is too neon red or pinkish, this will be the right time to add some blue food colouring. I’m going to type this in capital letters: ADD A VERY, VERY SMALL AMOUNT OF BLUE FOOD COLOURING. I messed up 2 batches of fake blood, because the blue food colouring was too overpowering. We certainly don’t want purple blood now, do we? Again, rather add a tiny bit, then work your way from there.

4. Depending on the amounts you used, if the blood doesn’t look like the right texture, add a small amount of bicarbonate of soda. Once again, start with a small amount and gradually add more.

5. Use the fake blood to good effect.

It is guaranteed that you may not get this right the first time. Like I said, I had to go through 3 batches to get the desired result. If you’re looking for a cheap, easy way to make fairly realistic-looking blood, this is probably it.


CSI Drama – Part 3

In the final part of my CSI Drama, we have to show the victims of our serial killer and how he went about killing them. Probably not for the fainthearted…

VICTIM 1

Alfred Cunningham was stalking this victim after he came out of a pub. He followed the victim for a couple of blocks, but the victim soon noticed that he was being followed. In panic, the victim storms into a deserted building, with Alfred close behind. Alfred gets hold of his victim around the corner and starts to repetitively stab his victim’s body. As mentioned before, Alfred washes the victim’s hands after he is done stabbing him.

DSC_0400 DSC_0395 DSC_0399 DSC_0393 DSC_0392 DSC_0390 DSC_0382 DSC_0402

VICTIM 2

Alfred used the same technique as before to stalk, corner his victim and eventually kill him. Alfred spotted this victim while he and his friends were walking around town, looking for a place to party. After giving up on looking for a place where they can have fun for the night, the group of friends slowly started splitting up one by one. Alfred has already set his sights on one of them and waited for him to be on his own. As the victim neared his apartment, he noticed that there was someone standing suspiciously behind him at a distance. Alfred closed on his victim while the victim was still busy trying to unlock the door of the building. As Alfred was within a feet away of his victim, his victim starts running up the staircase to his apartment. In a state of immense panic, the victim tripped on one of the stairs and ended up on the floor. This gave Alfred the perfect opportunity to unleash a repetition of stabs onto his victim’s body.

DSC_0437 DSC_0444 DSC_0416 DSC_0422 DSC_0418 DSC_0426 DSC_0425 DSC_0433

I used flash photography and no lighting on purpose to make the photos look more “on-the-scene” and amateur-like… Almost as if it was seen through the serial killer’s eyes.

In the next post, I will explain how I made the fake blood for this assignment.

Photos were taken with a Nikon D5100.

Nature Through My Windows

In this assignment, we had to take photos to show the passing of time during the day. This was a very interesting assignment for me, because I was truly amazed at how quickly the lighting conditions can change within an hour… Especially during the morning!

07:00

7 O'CLOCK

ISO: 400

Shutter Speed: 4″

Aperture: F5.6

08:00

8 O'CLOCK

ISO: 400

Shutter Speed: 1/50

Aperture: F5.6

14:00

2 O'CLOCK

ISO: 400

Shutter Speed: 1/250

Aperture: F5.6

16:00

4 O'CLOCK

ISO: 400

Shutter Speed: 1/400

Aperture: F5.6

17:00

5 O'CLOCK

ISO: 400

Shutter Speed: 1/80

Aperture: F5.6

18:00

6 O'CLOCK

ISO: 400

Shutter Speed: 1/30

Aperture: F5.6

Unfortunately, I wasn’t able to take photos during the late morning, due to class times. Seeing as that it’s currently wintertime here in South Africa, it was difficult to take photos during the early morning because it was either very cloudy, misty or raining… It would’ve been great to capture that bright yellow-orange tint that the morning sun gives the environment!

All of these photos were taken with a Nikon D5100 on a tripod.

Lighting Assignment

For this assignment, we had to get creative with light sources and angles. I decided to do this exercise with the help of someone who lives close by. Yes, he is indeed the model in these next photos…


SIDE LIGHTING


DSC_0356


REAR LIGHTING


DSC_0360


TOP LIGHTING


DSC_0363


BOTTOM LIGHTING


DSC_0365


I took all of these photos with a Nikon D5100 on a tripod and my source of the lighting was the flash on my iPhone 4.

Soul Searchin’

I used to write poems quite often when I was younger, but as the years went by, my inspiration started to run dry. When I moved to Cape Town earlier this year, it seemed as if some inspiration was slowly coming back to me again. I wrote this poem when I thought about how the city life can change a young man’s outlook on life. Especially if he came from a small town like I did…


OH DEAR CITY


Come on oh dear city

Change me for I know no better

Dare to change my beliefs

Show  me what I have up my sleeves


Show me your index of streets

Teach me the people’s creeds

Your fumes a shock to my lungs

Lingo on the tip of their tongues


Don’t shy test my moral strength

To prove there’s no limited length

I no longer long for the country side

For the child inside of me has died

Colour Wheel: The Most Disastrous Assignment To Date

We were given an assignment to take photos of the 12 colours on the colour wheel and then use our creativity to arrange the photos to form a colour wheel.

I’m going to be honest, this assignment did not go as planned at all… For various reasons:

1) Due to lengthy class times, by the time I finished with my last class of the day, the sun has already set and the lighting made it very difficult to take photos.

2) Due to other difficulties, I had to change my shooting location from Cape Town, to my local town of Paarl. Paarl can’t be compared to a city such as Cape Town, because it’s a small town situated in the wine lands and doesn’t offer as much excitement as the Mother City.

3) My original idea for this assignment was to take the 12 pictures, use “colour isolation” to highlight the colour that I wanted to display, then put all of these colours inside a template, so that it looks like a traditional colour wheel. I was hoping to take the easy way out and just purchase a colour isolation app on the App Store, but I was 30 US cents short of making the cheapest purchase. Then, I tried following colour isolation tutorials that can be done on GIMP (very similar to Photoshop), but none of them had the outcome that I was hoping for. The template tutorials also didn’t seem to work.

4) I guess I didn’t use my time wisely enough…

Here’s an example of colour isolation:

url

And the colour wheel template I was hoping to use…

color wheel outline
Nevertheless, here are the photos that I took of the 12 colours that I could find in my local town…

RED

DSC04410

RED ORANGE

DSC04430

ORANGE

DSC04431

YELLOW ORANGE

DSC04418

YELLOW

DSC04421

YELLOW GREEN

This was honestly the best I could find for yellow green. Yellow green is basically a neon green and that colour was very difficult to find in my town…

DSC04433

GREEN

DSC04422

BLUE GREEN

DSC04417

BLUE

DSC04411

BLUE VIOLET

DSC04426

VIOLET

DSC04429

RED VIOLET

DSC04441

I believe that nature and organic life produces the most diverse range of colours, so I decided to make this assignment a little bit more challenging and interesting. I wanted to take photos of materialistic and man-made objects only. Finding purple and lime green was such a mission!

The yearly interschools between Paarl Boys’ High and Paarl Gimnasium is taking place this weekend and every year they “decorate” the town with banners representing their school’s colours. Needless to say, there was definitely not a shortage of these specific colours!

The two colours that I came across the most, were red and green. This is because of all the road signs and green dustbins that are situated around the town.

By taking all of these photos and information into account, I truly hope that you can visualize what I had in mind… I think the final product would’ve looked very good and original!

Lastly, I can’t stress enough how important and vital it is to learn to use your camera in Manual mode. It just amazed me again how inaccurate the colour can come out on your photo if you use Auto mode. The only reason why I was using Auto mode/”The Green Square Of Death”, is because I was in a hurry to get my photos taken.

All photos were taken with the Sony Cyber-shot DSC-HX100V.

“And Greece?”

Last year, I had the wonderful opportunity of going to Greece with my girlfriend. A place that’s very close to her heart… We spent most of our time on one of Greece’s islands, Mytilene, but we managed to also go to Athens on the last day of our trip.

Here are a few Intsagram photos that I took while I was there…

It is very important to note that all of these photos were taken by me. Also, my iPhone 4′s camera is the preferred device to capture all of these photos while I’m on the move. Enjoy!

IMG_0414 IMG_0420 IMG_0417 IMG_0418 IMG_0860 IMG_0865 IMG_1023 IMG_0868 IMG_0419 IMG_1050 IMG_0383 IMG_1046

Taste In Music – Part 1

For once, this post is a bit more about me… I’m very, very big on music, so I decided to make a post about my music taste. To make it more easy for me to give you guys a broad idea of what my music taste is like, I thought of mentioning a few genres and then giving my favourite song within that genre. I hope that you will enjoy these amzaing sounds just as much as I always do!

TRANCE

As you will probably notice, I’m very fond of my Electronic Dance Music (EDM). Although, I’m not very big on Trance, but this is by far my favourite Trance song at the moment…

https://soundcloud.com/anjunabeats/audien-iris

DUBSTEP

I kind of missed the Dubstep train when it started becoming more commercial, but the more mainstream it became, the more I started disliking it… Nevertheless, I still listen to this one on a regular basis…

DRUM & BASS

I’m quite an avid listener of good old Drum & Bass, and this is still my favourite track of all time…

TRAP

I’m quite new to trap music and it’s by far not my favourite EDM genre, but I think this is an absolute gem of a Trap song…

https://soundcloud.com/bird-peterson/avicii-levels-drankenstein

HOUSE

For many years, House has been one of my favourite EDM genres and also one of my favourite music genres overall… Nothing explains it better than Satin Jacket’s “You Make Me Feel Good”!

DEEP HOUSE

Another EDM genre that I’m not too familiar with, but this one is on repeat!

PROGRESSIVE HOUSE

This is most probably my favourite sub-genre of House music… Throughout the years, this is still my favourite!

ELECTRO HOUSE

No explanation needed…

https://soundcloud.com/wolfganggartner/montezuma-original-mix

ELECTRONICA

I’m quite a big fan of Matthew Dear and after listening to so many of his tracks, this is the one I’ll always be fond of…

ELECTRONIC

The same goes for Pretty Lights… I’m a very big fan and this is my favourite track of this great up and coming producer!

https://soundcloud.com/prettylights/pretty-lights-drift-away

BREAKS

The only major Breaks artist I know is Fatboy Slim, but I’ve always liked to call Evil Nine’s “Hired Goons” one of my “life’s soundtracks”…

SYNTHPOP

In my opinion, this is pretty impressive for a local South African band… Their whole album is worth listening to!

Obviously there are a lot more EDM genres out there, but these ones that I mentioned above, are the ones that I listen to the most…

I honestly hope that you enjoyed this first part of my “Taste In Music” post… In Part 2, I’ll be focusing more on rock genres for all you guitar lovers out there!


CSI Drama – Part 2

In this second part of my assignment for my serial killer, I’m going to focus on the finer details of my killer.

Name: Alfred Cunningham

Known As: The OCD Killer

Birthday: 05/14/1975

Height: 6′ 1″

Weight: 190 lbs

Sex: Male

Hair: Dark Brown

Eyes: Dark Green

My serial killer’s modus operandi for killing his victims usually involved stabbing them. Because of his strong OCD background, he felt that he had to stab his victims several times to make sure that they have been stabbed and that they are indeed dead. Just like his OCD forced him to make sure that the door is closed or that the light is off.

He used stalking to carefully pick his victims. He usually chose his victims based on their appearance. If his victims looked “untidy”, “filthy” or “messy”, they stood a very good chance of being killed. He would wait for his victims to be alone or out of sight of the public and then make his move. He chose male victims above female victims.

His victims were between the ages of 20 to 30, which was roundabout the age he started killing.

The reason for his primary weapon being a knife, is that a firearm is too “messy”. Seeing as that OCD patients like to keep their hands clean, a knife was the obvious weapon of choice for my serial killer. With a knife, it was easy for him to get in a few deadly stabs without having to worry about the mess a gunshot would’ve caused, due to to the entry wounds and exit wounds on the victim’s body.

After killing every victim, he would wash their hands.

If you do happen to match any of these details, it is completely coincidental.


“How About Hong Kong?”

This time, all of these photos are from when I went to Hong Kong sometime ago last year. We also went to an aquarium while I was there and saw some rather interesting marine life…

It is very important to note that all of these photos were taken by me. Also, my iPhone 4′s camera is the preferred device to capture all of these photos while I’m on the move. Enjoy!

IMG_1099 IMG_0594 IMG_0577 IMG_0619 IMG_1182 IMG_1158 IMG_0618 IMG_1148 IMG_1141 IMG_1139 IMG_1157 IMG_1171 IMG_1159 IMG_1186 IMG_1117 IMG_1119 IMG_1116 IMG_1123 IMG_1175 IMG_0706 IMG_1037 IMG_1163